Blend用法
· 阅读需 4 分钟
opengl的blend用于颜色混合 ,如果不用混合,两张贴图贴在一起时,前面的贴图会覆盖后面的贴图,加上混合功能,两张贴图可以很好的贴合在一起。用代码演示一下用法。
blend开启方法
blend主要使用下面几个函数:
glEnable(GL_BLEND): 开启blend功能glBlendFunc(GLenum sfactor, GLenum dfactor): sfactor源因子,dfactor目标因子
示例代码
我们先画一个普通场景
void display( GLFWwindow* window )
{
    glClearColor( 0, 0, 0.4, 0 );
    glClear( GL_COLOR_BUFFER_BIT | GL_DEPTH_BUFFER_BIT);

    glUseProgram(boxProgramID);


    glm::mat4 projection = glm::perspective(glm::radians(45.0f), (float) 5 / (float)5, 0.1f, 100.0f);
    glm::mat4 view = glm::lookAt(glm::vec3(1,2,3), glm::vec3(0,0,0), glm::vec3(0,1,0));
    glm::mat4 model = glm::mat4(1.0f);
    glm::mat4 mvp = projection * view * model;

    // 1.画地面
    GLuint mvpId = glGetUniformLocation(boxProgramID, "MVP");
    glUniformMatrix4fv(mvpId, 1, GL_FALSE, &mvp[0][0]);
    glBindVertexArray(FloorVAO);
    glBindTexture(GL_TEXTURE_2D, floorTexture);
    glDrawArrays(GL_TRIANGLES, 0, 6);

    // 2.画立方体
    glBindVertexArray(VAO);
    glBindTexture(GL_TEXTURE_2D, texture);
    glDrawArrays(GL_TRIANGLES, 0, 36);

    // 3.画blend物体
    model = glm::mat4(1.0f);
    model = glm::translate(model, glm::vec3(0, 0, 1.01f));
    mvp = projection * view * model;
    glUniformMatrix4fv(mvpId, 1, GL_FALSE, &mvp[0][0]);
    glBindTexture(GL_TEXTURE_2D, blendTexture);
    glDrawArrays(GL_TRIANGLES, 0, 6);
}

void prepare() {
    boxProgramID = LoadShaders( "data/shader/03.MVP.vs", "data/shader/03.MVP.fs" );

    const GLfloat g_vertex_buffer_data[] = {
            -0.5f, -0.5f, -0.5f,  0.0f, 0.0f,
            0.5f, -0.5f, -0.5f,  1.0f, 0.0f,
            0.5f,  0.5f, -0.5f,  1.0f, 1.0f,
            0.5f,  0.5f, -0.5f,  1.0f, 1.0f,
            -0.5f,  0.5f, -0.5f,  0.0f, 1.0f,
            -0.5f, -0.5f, -0.5f,  0.0f, 0.0f,

            -0.5f, -0.5f,  0.5f,  0.0f, 0.0f,
            0.5f, -0.5f,  0.5f,  1.0f, 0.0f,
            0.5f,  0.5f,  0.5f,  1.0f, 1.0f,
            0.5f,  0.5f,  0.5f,  1.0f, 1.0f,
            -0.5f,  0.5f,  0.5f,  0.0f, 1.0f,
            -0.5f, -0.5f,  0.5f,  0.0f, 0.0f,

            -0.5f,  0.5f,  0.5f,  1.0f, 0.0f,
            -0.5f,  0.5f, -0.5f,  1.0f, 1.0f,
            -0.5f, -0.5f, -0.5f,  0.0f, 1.0f,
            -0.5f, -0.5f, -0.5f,  0.0f, 1.0f,
            -0.5f, -0.5f,  0.5f,  0.0f, 0.0f,
            -0.5f,  0.5f,  0.5f,  1.0f, 0.0f,

            0.5f,  0.5f,  0.5f,  1.0f, 0.0f,
            0.5f,  0.5f, -0.5f,  1.0f, 1.0f,
            0.5f, -0.5f, -0.5f,  0.0f, 1.0f,
            0.5f, -0.5f, -0.5f,  0.0f, 1.0f,
            0.5f, -0.5f,  0.5f,  0.0f, 0.0f,
            0.5f,  0.5f,  0.5f,  1.0f, 0.0f,

            -0.5f, -0.5f, -0.5f,  0.0f, 1.0f,
            0.5f, -0.5f, -0.5f,  1.0f, 1.0f,
            0.5f, -0.5f,  0.5f,  1.0f, 0.0f,
            0.5f, -0.5f,  0.5f,  1.0f, 0.0f,
            -0.5f, -0.5f,  0.5f,  0.0f, 0.0f,
            -0.5f, -0.5f, -0.5f,  0.0f, 1.0f,

            -0.5f,  0.5f, -0.5f,  0.0f, 1.0f,
            0.5f,  0.5f, -0.5f,  1.0f, 1.0f,
            0.5f,  0.5f,  0.5f,  1.0f, 0.0f,
            0.5f,  0.5f,  0.5f,  1.0f, 0.0f,
            -0.5f,  0.5f,  0.5f,  0.0f, 0.0f,
            -0.5f,  0.5f, -0.5f,  0.0f, 1.0f
    };

    float fllor_vertex_buffer_data[] = {
            5.0f, -0.5f,  5.0f,  1.0f, 0.0f,
            -5.0f, -0.5f,  5.0f,  0.0f, 0.0f,
            -5.0f, -0.5f, -5.0f,  0.0f, 1.0f,

            5.0f, -0.5f,  5.0f,  1.0f, 0.0f,
            -5.0f, -0.5f, -5.0f,  0.0f, 1.0f,
            5.0f, -0.5f, -5.0f,  1.0f, 1.0f
    };
    float blend_vertex_buffer_data[] = {
            0.0f,  0.5f,  0.0f,  0.0f,  0.0f,
            0.0f, -0.5f,  0.0f,  0.0f,  1.0f,
            1.0f, -0.5f,  0.0f,  1.0f,  1.0f,

            0.0f,  0.5f,  0.0f,  0.0f,  0.0f,
            1.0f, -0.5f,  0.0f,  1.0f,  1.0f,
            1.0f,  0.5f,  0.0f,  1.0f,  0.0f
    };

    // 1.VAO1、VBO的数据
    glGenVertexArrays(1, &VAO);
    glBindVertexArray(VAO);
    GLuint VBO1;
    glGenBuffers(1, &VBO1);
    glBindBuffer(GL_ARRAY_BUFFER, VBO1);
    glBufferData(GL_ARRAY_BUFFER, sizeof(g_vertex_buffer_data), g_vertex_buffer_data, GL_STATIC_DRAW);
    glEnableVertexAttribArray(0);
    glVertexAttribPointer(0, 3, GL_FLOAT, GL_FALSE, 5 * sizeof(GLfloat), (void*)0);
    // 纹理坐标
    glEnableVertexAttribArray(1);
    glVertexAttribPointer(1, 2, GL_FLOAT, GL_FALSE, 5 * sizeof(GLfloat), (void*)(3 * sizeof(GLfloat)));

    // 2.地面贴图
    glGenVertexArrays(1, &FloorVAO);
    glBindVertexArray(FloorVAO);
    GLuint VBO2;
    glGenBuffers(1, &VBO2);
    glBindBuffer(GL_ARRAY_BUFFER, VBO2);
    glBufferData(GL_ARRAY_BUFFER, sizeof(fllor_vertex_buffer_data), fllor_vertex_buffer_data, GL_STATIC_DRAW);
    glEnableVertexAttribArray(0);
    glVertexAttribPointer(0, 3, GL_FLOAT, GL_FALSE, 5 * sizeof(GLfloat), (void*)0);
    // 纹理坐标
    glEnableVertexAttribArray(1);
    glVertexAttribPointer(1, 2, GL_FLOAT, GL_FALSE, 5 * sizeof(GLfloat), (void*)(3 * sizeof(GLfloat)));

    // 2.blend贴图
    glGenVertexArrays(1, &BlendVAO);
    glBindVertexArray(BlendVAO);
    GLuint VBO3;
    glGenBuffers(1, &VBO3);
    glBindBuffer(GL_ARRAY_BUFFER, VBO3);
    glBufferData(GL_ARRAY_BUFFER, sizeof(blend_vertex_buffer_data), blend_vertex_buffer_data, GL_STATIC_DRAW);
    glEnableVertexAttribArray(0);
    glVertexAttribPointer(0, 3, GL_FLOAT, GL_FALSE, 5 * sizeof(GLfloat), (void*)0);
    // 纹理坐标
    glEnableVertexAttribArray(1);
    glVertexAttribPointer(1, 2, GL_FLOAT, GL_FALSE, 5 * sizeof(GLfloat), (void*)(3 * sizeof(GLfloat)));

    // 纹理数据
    floorTexture = loadTexture("data/img/33.png");
    texture = loadTexture("data/img/11.jpg");
    blendTexture = loadTexture("data/img/chick.png");

    glEnable(GL_DEPTH_TEST);
}
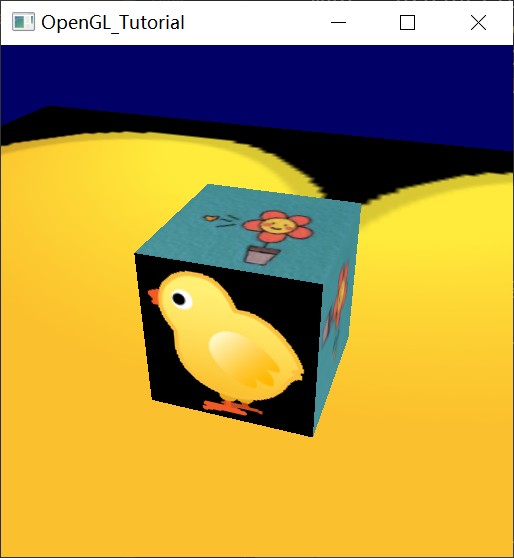
都是普通贴图操作,显示效果如下:

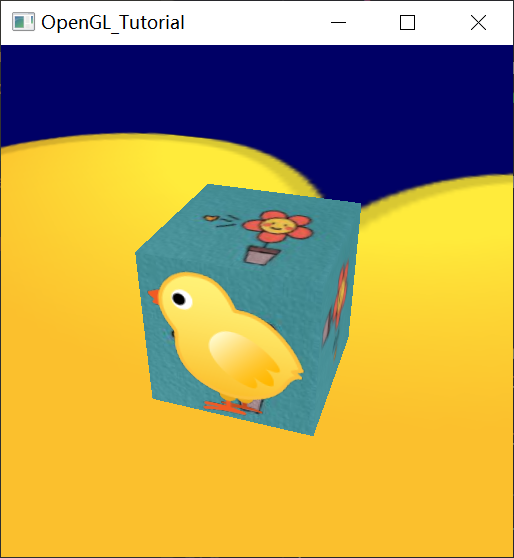
因为是直接贴图覆盖的,所以小鸡周边alpha为0的颜色显示为黑色,如果加上blend功能,则可以看到后面图片的内容了:
glEnable(GL_BLEND);
glBlendFunc(GL_SRC_ALPHA, GL_ONE_MINUS_SRC_ALPHA);
最终显示效果:
